README.md
1# RA6M3-HMI-Board BSP Instruction
2
3[中文](README_ZH.md)|English
4
5## Introduction
6
7Get ready to dive into the world of the RA6M3-HMI-Board development board! This document provides all the juicy details on the BSP (Board Support Package) instructions. By checking out the Quick Start section, developers can hit the ground running with this BSP and have RT-Thread up and running on the development board in no time.
8
9Here’s what you can expect to find inside:
10
11• A comprehensive introduction to the development board
12
13• A handy BSP Quick Start Guide
14
15Let’s start with an introduction to the development board. The HMI-Board board, built on the foundation of the Renesas RA6M3 MCU, is a game-changer. With its flexible software package and IDE configuration, users can easily evaluate the features of the RA6M3 MCU group and develop cutting-edge embedded system applications.
16
17Curious about what it looks like? Check out the front view of the development board in the figure below:
18
19
20
21The back view:
22
23
24
25- ## Hardware Framework
26
27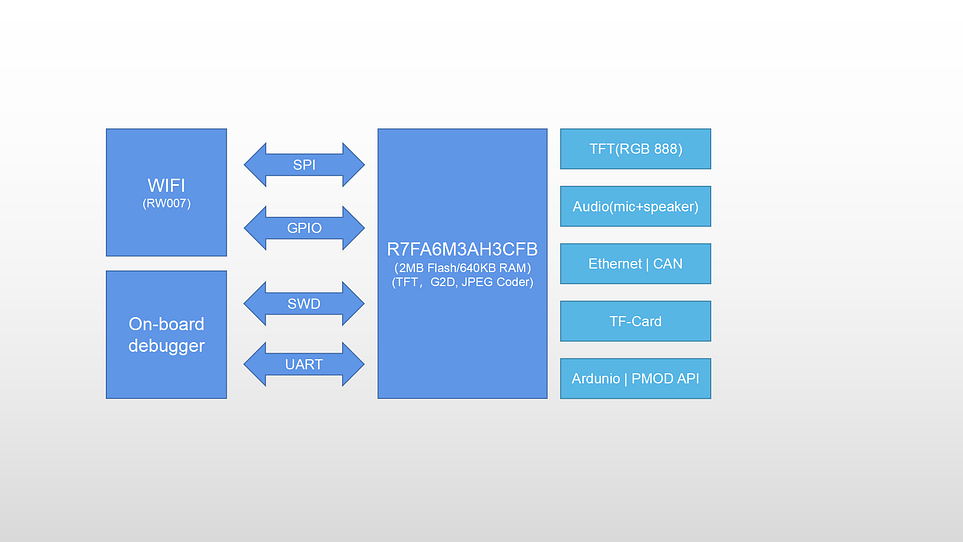
28
29 - RA6M3(R7FA6M3AH3CFB): Cortex-M4F core, 120Mhz main frequency, with 2MB Flash/640KB RAM, integrated TFT controller, 2D accelerator, and JPEG decoder.
30 - 4.3 inch LCD (RGB 888)
31 - On-board emulator
32 - Ethernet
33 - RW007 (SPI high-speed WIFI)
34 - USB-Device
35 - TF Card
36 - CAN
37 - 1 microphone, 1 speaker
38 - Arduino expansion interface
39 - 2 PMOD expansion interfaces
40 - 4 buttons: 3 user buttons, one reset button
41
42
43
44### Peripheral Condition
45
46Each peripheral supporting condition for this BSP is as follows:
47
48| **On-chip Peripheral Drivers** | **Support** | Remark |
49| ------------------------------ | ----------- | ------------------------------------- |
50| UART | Support | UART9 is the default log output port. |
51| GPIO | Support | |
52| LCD | Support | |
53| SDHI | Support | |
54| JPEG | Support | |
55| G2D | Support | |
56| RW007 | Support | |
57| ETH | Support | |
58| SPI | Support | |
59| I2C | Support | |
60| CAN | Support | |
61
62## Instructions for Use
63
64The instructions for use are divided into the following two sections:
65
66• Quick Start
67
68This section is a user guide for newcomers to RT-Thread. By following simple steps, you can run the RT-Thread operating system on this development board and see the experimental results.
69
70• Advanced Use
71
72This section is for developers who want to enable more development board resources on the RT-Thread operating system. By using the ENV tool to configure the BSP, you can enable more on-board resources and achieve more advanced functions.
73
74## Quick Start
75
76This BSP currently only provides an MDK5 project. The following tutorial takes the MDK5 development environment as an example to introduce how to run the system.
77
78**Compile and Download**
79
80• Compile: Double-click the **project.uvprojx** file to open the MDK5 project and compile the program.
81
82• Download: Click the Debug button in MDK to download and debug
83
84**Running results**
85
86After the program is downloaded successfully, the system will automatically run and print system information.
87
88Connect the corresponding serial port of the development board to the PC, open the corresponding serial port (115200-8-1-N) in the terminal tool, reset the device, and you can see RT-Thread’s output information. Enter the help command can view the commands supported by the system.
89
90```
91 \ | /
92- RT - Thread Operating System
93 / | \ 5.0.0 build Jan 4 2023 10:14:56
94 2006 - 2022 Copyright by RT-Thread team
95Hello RT-Thread!
96msh >
97msh >help
98help - RT-Thread shell help.
99ps - List threads in the system.
100free - Show the memory usage in the system.
101clear - clear the terminal screen
102version - show RT-Thread version information
103list - list objects
104
105msh >
106```
107
108**Application Entry Function**
109
110The entry function of the application layer is in **bsp\renesas\ra6m3-hmi-board\src\hal_entry.c** in `void hal_entry(void)`. Source files that you created can be placed directly in the src directory.
111
112```
113void hal_entry(void)
114{
115 rt_kprintf("\nHello RT-Thread!\n");
116
117 while (1)
118 {
119 rt_pin_write(LED3_PIN, PIN_HIGH);
120 rt_thread_mdelay(500);
121 rt_pin_write(LED3_PIN, PIN_LOW);
122 rt_thread_mdelay(500);
123 }
124}
125```
126
127### Advanced Features
128
129**Resources & Documents**
130
131- [Development Board Overview](https://www.renesas.com/us/en/products/microcontrollers-microprocessors/ra-cortex-m-mcus/cpk-ra6m4-evaluation-board#overview)
132- [User Guide](https://www2.renesas.cn/cn/zh/document/mah/1527156?language=zh&r=1527191)
133- [RA MCU](https://www.renesas.com/us/en/document/gde/1520091)
134- [RA6 MCU Quick Design Guide](https://www.renesas.com/us/en/document/apn/ra6-quick-design-guide)
135
136**ENV Configuration**
137
138• How to use the ENV tool: [RT-Thread env tool user manual](https://www.rt-thread.io/document/site/programming-manual/env/env/).
139
140This BSP only enables the function of UART9 by default. If you're looking for more advanced functions such as components and software packages, ENV tool for configuration is available.
141
142The steps are as follows:
143
1441. Open the env tool under bsp.
1452. Enter the `menuconfig` command to configure the project, and save and exit after configuration.
1463. Enter the `pkgs --update` command to update the software package.
1474. Enter the `scons --target=mdk5` command to regenerate the project.
148
149**FSP Configuration**
150
151* How to Use FSP: [Configuring Peripheral Drivers for RA Series Using FSP](https://www.rt-thread.org/document/site/#/rt-thread-version/rt-thread-standard/tutorial/make-bsp/renesas-ra/RA系列使用FSP配置外设驱动?id=ra系列使用-fsp-配置外设驱动)
152
153The current repository's BSP is configured with the minimum footprint enabled by default. Users can enable peripheral configurations through the following steps:
154
1551. Open the `env` tool in the BSP directory and use the `scons --target=mdk5` command to generate an MDK project.
1562. Open the `project.uvprojx` file in the BSP directory, select the `Software Components` configuration in the top navigation bar, and open the configuration button next to `RA Configuration` under `Flex Software`. This operation will automatically detect the installed FSP version on the current computer. After selecting the specified version, enter FSP.
157 
1583. Upon entering FSP, pre-configured peripherals are already present. Click the `Generate Project Content` button to generate the required driver files.
159 
1604. Return to `env`, enable the necessary peripheral configurations, save, and exit.
161
162## Contribute the Code
163
164If you’re interested in the HMI-Board and have some cool projects you’d like to share with everyone, we’d love for you to contribute your code! You can check out [how to contribute to RT-Thread’s code](https://www.rt-thread.io/contribution.html). Let’s make something awesome together!
)