README.md
1# Vision Board BSP Introduction
2
3**English** | [**中文**](./README_zh.md)
4
5## Overview
6
7The Vision-Board is introduced by RT-Thread, in collaboration with Renesas Electronics, the vision board is based on the Renesas Cortex-M85 architecture RA8D1 chip, to provide engineers with a flexible and comprehensive development platform, empowering developers to gain deeper experiences in the field of machine vision.
8
9[](https://github.com/RT-Thread/rt-thread/blob/master/bsp/renesas/ra8d1-vision-board/docs/picture/logo.png)
10
11## Hardware Introduction
12
13The Vision-Board comes equipped with various onboard resources, including:
14
15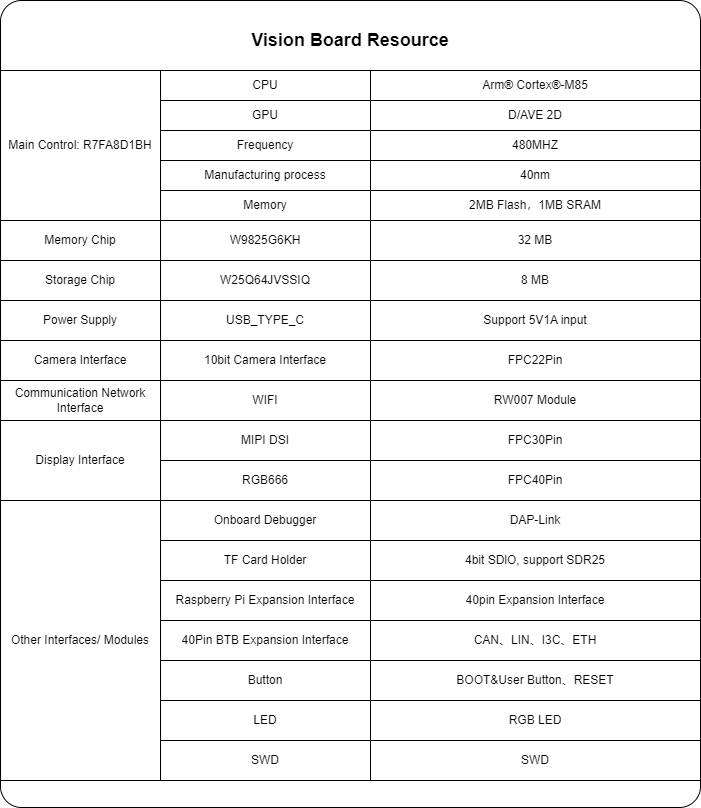
16
17
18
19## Peripheral Support
20
21The BSP currently supports several peripherals as listed below:
22
23| On-Chip Peripheral | Support Status | Remarks |
24| ------------------ | -------------- | ------------------------------------ |
25| UART | Supported | UART9 is the default log output port |
26| GPIO | Supported | |
27| USB | Supported | TinyUSB |
28| Camera | Supported | ov2640, ov7725, ov7670... |
29| SDHC | Supported | 1-bit, 4-bit |
30| ADC | Supported | |
31| DAC | Supported | |
32| SPI | Supported | |
33| PWM | Supported | |
34| RTC | Supported | |
35| FLASH | Supported | |
36| WDT | Supported | |
37| I2C | Supported | |
38| Wi-Fi | Supported | RW007 |
39
40- Note: The repository initially contains the minimal system. Additional peripherals can be added/enabled by referring to the [Peripheral Driver Usage Tutorial](https://www.rt-thread.org/document/site/#/rt-thread-version/rt-thread-standard/tutorial/make-bsp/renesas-ra/RA系列BSP外设驱动使用教程).
41
42## Template Project Description
43
44
45
46[](https://github.com/RT-Thread/rt-thread/blob/master/bsp/renesas/ra8d1-vision-board/docs/picture/1.png)
47
48[](https://github.com/RT-Thread/rt-thread/blob/master/bsp/renesas/ra8d1-vision-board/docs/picture/2.png)
49
50The RGB-LED, as shown above, is a common anode LED. The cathodes are connected to the microcontroller pins. For instance, the blue LED corresponds to pin P102. The LED can be lit by setting the microcontroller pin to a low level and turned off by setting it to a high level.
51
52## Software Introduction
53
54The source code for flashing the LED is located in `ra8d1-vision-board/src/hal_entry.c`. It defines a macro `LED_PIN` representing the LED pin number, corresponding to `BSP_IO_PORT_01_PIN_02` (P102).
55
56```
57#define LED_PIN BSP_IO_PORT_01_PIN_02 /* Onboard LED pins */
58```
59
60In the `hal_entry` function, this pin is configured as an output. The LED is toggled periodically (every 500 milliseconds) in the while loop.
61
62```
63void hal_entry(void)
64{
65 rt_kprintf("\nHello RT-Thread!\n");
66
67 while (1)
68 {
69 rt_pin_write(LED_PIN, PIN_HIGH);
70 rt_thread_mdelay(500);
71 rt_pin_write(LED_PIN, PIN_LOW);
72 rt_thread_mdelay(500);
73 }
74}
75```
76
77
78
79## Usage Instructions
80
81Usage instructions are divided into two sections:
82
83- Quick Start
84 - This section provides instructions for newcomers to RT-Thread to run the RT-Thread operating system on this development board and observe experimental results.
85- Advanced Usage
86 - This section is for developers who need to utilize more development board resources on the RT-Thread operating system. It guides users on enabling more onboard resources using the ENV tool to achieve more advanced functionality.
87
88### Supported Compilation Platforms
89
90- armclang (AC6 V6.19)
91- LLVM (V16/17) [ARM-software/LLVM-embedded-toolchain-for-Arm (github.com)](https://github.com/ARM-software/LLVM-embedded-toolchain-for-Arm/releases/tag/release-17.0.1)
92
93## FSP Version Introduction
94
95This BSP uses FSP 5.1.0 version for peripheral-related development. Users need to download and install it. Additionally, instructions for enabling additional peripherals are provided in the [Peripheral Driver Usage Tutorial](https://www.rt-thread.org/document/site/#/rt-thread-version/rt-thread-standard/tutorial/make-bsp/renesas-ra/RA系列BSP外设驱动使用教程).
96
97
98
99### Quick Start
100
101#### 1. Compiling with MDK:
102
103This BSP provides an MDK5 project. Compile and download the program using the MDK5 development environment.
104
105**Compile and Download**
106
107- Compile: Double-click the project.uvprojx file to open the MDK5 project and compile the program.
108- Download: Click the Debug button in MDK to download and debug."
109
110
111
112#### 2. Compiling with LLVM
113
114Open the current BSP using the ENV tool to set the toolchain and its corresponding path. Then, execute the `scons` command to compile.
115
116```
117set RTT_CC=llvm-arm
118set RTT_EXEC_PATH=D:\Progrem\LLVMEmbeddedToolchainForArm-17.0.1-Windows-x86_64\bin
119```
120
121execute the `scons` command to compile.
122
123```
124scons
125```
126
127**Observing the Program Execution**
128
129Once the program is downloaded successfully, the system will initiate automatically, displaying system information.
130
131Connect the development board's respective serial port to the PC. Launch the terminal tool and configure the serial port settings accordingly (115200-8-1-N). Upon resetting the device, you'll observe output information from RT-Thread. To explore the system's supported commands, enter the "help" command.
132
133```
134[D/main] sdram init success, mapped at 0x68000000, size is 33554432 bytes, data width is 16
135
136 \ | /
137- RT - Thread Operating System
138 / | \ 5.1.0 build Mar 5 2024 13:57:23
139 2006 - 2024 Copyright by RT-Thread team
140
141Hello RT-Thread!
142msh >
143msh >
144```
145
146
147
148### Advanced Usage
149
150**Resources and Documentation**
151
152- [Official Development Board Website](https://www.renesas.com/us/en/products/microcontrollers-microprocessors/ra-cortex-m-mcus/ek-ra8d1-evaluation-kit-ra8d1-mcu-group)
153- [Development Board User Manual](https://www.renesas.cn/cn/zh/document/mat/ek-ra8d1-v1-users-manual?r=25452351)
154
155**ENV Configuration**
156
157- How to use the ENV tool: [RT-Thread ENV Tool User Manual](https://www.rt-thread.io/document/site/programming-manual/env/env/)
158
159By default, this BSP only enables UART9 functionality. If you require more advanced features such as components, software packages, etc., you'll need to configure them using the ENV tool.
160
161The steps are as follows:
162
1631. Open the ENV tool in the bsp directory.
1642. Enter the "menuconfig" command to configure the project. Once configured, save and exit.
1653. Use the "pkgs --update" command to update software packages.
1664. Use the "scons --target=mdk5" command to regenerate the project.
167
168***FSP Configuration**
169
170- How to use FSP: [Configuring Peripheral Drivers Using FSP for RA Series](https://www.rt-thread.org/document/site/#/rt-thread-version/rt-thread-standard/tutorial/make-bsp/renesas-ra/RA系列使用FSP配置外设驱动?id=ra系列使用-fsp-配置外设驱动)
171
172The BSP repository currently enables the minimum configuration by default. Users can enable ENV peripheral configurations through the following steps:
173
1741. Open the ENV tool in the bsp directory and generate an MDK project using the `scons --target=mdk5'`Command.
1752. Open the `project.uvprojx` file in the bsp directory. Navigate to the `Software Components"`configuration in the top navigation bar. Open the configuration button next to `RA Configuration` under `Flex Software`. This action will automatically detect the installed FSP version on your computer. After selecting the specified version, enter FSP.
176
177[](https://github.com/RT-Thread/rt-thread/blob/master/bsp/renesas/docs/figures/mdk_rasc.png)
178
1793. Inside FSP, you'll find some pre-configured peripherals. Click the `Generate Project Content` button to generate the required driver files.
180
1811. [](https://github.com/RT-Thread/rt-thread/blob/master/bsp/renesas/docs/figures/fsp_configure.png)
182 4. Return to ENV, save and exit after enabling the required peripheral configurations.
183
184
185
186## Contact Information
187
188If you have any ideas or suggestions during usage, we encourage you to contact us via the [RT-Thread Community Forum](https://club.rt-thread.io/).
189
190## SDK Repository
191
192This is the SDK repository for Vision Board: [sdk-bsp-ra8d1-vision-board](https://github.com/RT-Thread-Studio/sdk-bsp-ra8d1-vision-board). This repository includes peripheral drivers and a variety of sample projects. If you'd like to experience open-source examples provided by the official website/community, please visit this repository for development. The RT-Thread main repository only maintains the latest driver-related code.
193
194## Code Contributions
195
196If you're interested in Vision Board and have some exciting projects to share with the community, wlecome any contributions. Please refer to [How to Contribute to RT-Thread Code](https://www.rt-thread.org/document/site/#/rt-thread-version/rt-thread-standard/development-guide/github/github).
)
)
)
)
)
)
)
)
)
)
)